
The Setup:
We are going to need two things to set this up:
1) KAPEKAPE can be downloaded from here
2) A web-server
This can be either a local or cloud based server.
The first thing we want to do is download and setup KAPE on the web-server. I am not going to go into detail on setting KAPE up. There is plenty of documentation out there. Once KAPE is ready, we need to make an SFTP configuration for KAPE, this is how we will send the collection back to the server. At a minimum, the SFTP account is going to need upload and delete access. More information can be found here on setting up SFTP for KAPE.
 |
| Example configuration file. |
We can now create a scheduled task to run KAPE in SFTP mode when ever the server starts.


Next we can setup the web-server. I created a script to do all the heavy lifting so you don't have to. It can be found here. What this script does is sets up a web-server with WebDAV enabled, creates the accounts needed to access the site and creates a WMI subscription for the automation. *Please note, this is not production ready. You will need to secure things better than what the script does.
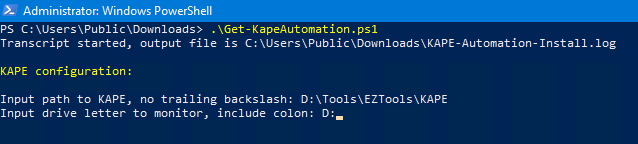
Web-server setup:
Here's a breakdown of what the script is doing:
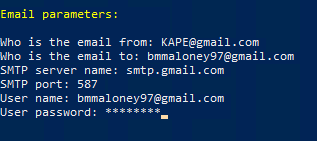
Next up, email parameters. *Note: the email password will be encrypted with the system account.
The script will then install the needed features for the web-server. WebDAV is enabled so we can mount KAPE remotely as a file share. This way, there is no need to download KAPE to the endpoint. After that, we need to setup the user and group that will access the site. This group has read only access so nothing can be written back to the KAPE folder when mounted.

After that, the script will finish configuring WebDAV, change the WMI Provider Host Quota Configuration and setup the WMI subscription. There are a couple of reasons I went with a WMI subscription. There isn't a script laying around to accidentally get deleted and this also runs KAPE under the system account. Once done, the system will need to reboot.

Ready for action:
With setup complete, we can now test everything out. On the machine you want to collect from, check and see if you can get to the web-site. You should see the directory for your KAPE instance.
Now that we know we can reach the site, lets mount it as a network share.

After that, we can run KAPE. For the automation piece we will need to use the KAPE_automation module. The module takes two variables: module and mvar. The module variable is the modules you want KAPE to run on the collection. Just like KAPE itself, this is a comma separated list. The mvar variable takes a key:value pair but instead of using ^ as a separator, it uses ◙ (Alt+10) for the separator. See the example in the module.

Let's try it out. The following command will collect the registry hives, $MFT, and Symantec AV logs. They will be sent to the server via SFTP, mount the vhdx, and parse the Symantec logs and create a time line with the date range of 06/19/2020-06/12/2020. Once complete, an email will be sent when everything is done.
\\192.168.0.20\kape\kape.exe --tsource c --target RegistryHives,FileSystem,Symantec_AV_Logs --tflush --tdest C:\temp\tout --mdest C:\temp\tout\mout --mflush --module KAPE_Automation --mvars module:SEPM_Logs,Mini_Timeline,Mini_Timeline_Slice_by_Daterange^mvar:dateRange:06/19/2020-06/12/2020◙computerName:Collection --vhdx %m --scp 22 --scu KapeSFTP --scpw NrsxPmU8XWe72WBs --scs 192.168.0.20 --debug --trace
 |
| Empty case folder on collection server. |
 |
| No email. |
 |
| Collection complete and uploaded to server. |
 |
| Parsed Symantec AV logs. |
 |
| Parsed timeline. |
 |
| Email sent upon completion. |
Conclusion:
I hope this helps to setup remote collection and parsing whit KAPE. If there are any ideas or suggestions to help improve the automation of KAPE, please leave a comment. You can also leave an issue or pull request at the GitHub page.

