Pictures are worth a thousand words. Enjoy!!!!
HKLM\SYSTEM\CurrentControlSet\Enum\USBSTOR
HKLM\SYSTEM\CurrentControlSet\Enum\USB
HKLM\SYSTEM\MountedDevices
Monday, August 21, 2017
Thursday, August 17, 2017
Comparing Packet Captures to Procmon Traces
Trying to match Procmon entries to a packet capture can seem frustrating at first. There are two things that stand out to me in the Procmon entries:
1. The times are off ever so slightly compared to the packet capture
2. There is not an entry for every packet in Procmons output
We can solve this problem by looking at the times and lengths of the packets. To make things a little easier to read, I'll use the csv output from Procmon and use windump to filer the packets. The first thing I do is filter the Operation column so it contains tcp events.
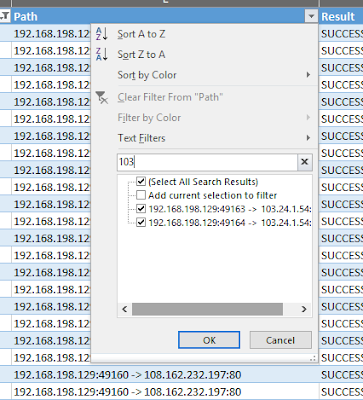
And then I filter the Path column by the IP address I am trying to match.
The csv should look something like this:

Now that the Procmon csv is filtered, I can run Windump and filter on the IP in question. Piping the output to a file will make this easier. To do this, run the following command:
WinDump.exe -n -p -r malware.pcap host 103.24.1.54 > output.txt
The resulting file should look something like this:
The number in the parentheses is the length of the packet. Once we start matching the approximate times and the length of the packets, the picture becomes a lot clearer.
I hope this helps anyone trying to compare packet captures to Procmon output.
1. The times are off ever so slightly compared to the packet capture
2. There is not an entry for every packet in Procmons output
We can solve this problem by looking at the times and lengths of the packets. To make things a little easier to read, I'll use the csv output from Procmon and use windump to filer the packets. The first thing I do is filter the Operation column so it contains tcp events.
And then I filter the Path column by the IP address I am trying to match.
The csv should look something like this:

Now that the Procmon csv is filtered, I can run Windump and filter on the IP in question. Piping the output to a file will make this easier. To do this, run the following command:
WinDump.exe -n -p -r malware.pcap host 103.24.1.54 > output.txt
The resulting file should look something like this:
The number in the parentheses is the length of the packet. Once we start matching the approximate times and the length of the packets, the picture becomes a lot clearer.
I hope this helps anyone trying to compare packet captures to Procmon output.
Tuesday, July 18, 2017
ProcDOT plugin writing. Part 4 - Context Menu and CanBeVerified
Throughout this tutorial, we learned how to write a plugin for the the Main Menu. Writing a plugin for the context menu isn't any different. There are a couple of options available for the context menu I would like to touch on though to help make your plugin a little more professional.
Context Menu plugins allow us to get more granular with the data we are after. Let's say we want a context menu item that is only available when we right click on a server node. The plugin engine offers this feature though the CanBeVerified switch.
Before we continue, lets alter our cmd_line plugin so it becomes a Context Menu Item instead of being in the Main Menu. Open the cmd_line.pdp file in an editor and change the type from MainMenuItem to ContextMenuItemForGraph. Your pdp file should now look like this:
Name = cmd
Author = <your name>
Description = Open cmd prompt from ProcDOT's Main Menu
Version = 1
Type = ContextMenuItemForGraph
Architecture = WindowsBatchScript
File = cmd_line.bat
Priority = 9
RunHidden = 1
RunExclusively = 1
CanOverrideOtherPlugins = 0
CanOverrideProcdot = 0
Restart ProcDOT and load your graph again. If we right click anywhere on the graph, we should see cmd in the context menu. What we are trying to accomplish though is having a plugin show up if we right click on a server node. Lets right click on a server node an see what we need to do to have this happen.
Looking through our list of options, it looks like PROCDOTPLUGIN_CurrentNode_name would be a good candidate for what we are doing. Notice it is telling us that this is a server node. With this information, we can try to get our plugin to only show up if we right click on a server node.
To do this, we first have to set the CanBeVerified switch to 1 in our pdp file (add CanBeVerified = 1 to the end of the file). Lets stop ProcDOT and create our verify plugin. We'll start by creating a new pdp file called verify.pdp with the following content (Notice it has the CanBeVerified switch).
Name = Verify
Author = <your name>
Description = verify test
Version = 1
Type = ContextMenuItemForGraph
Architecture = WindowsBatchScript
File = verify.bat
Priority = 9
RunHidden = 0
RunExclusively = 1
CanOverrideOtherPlugins = 0
CanOverrideProcdot = 0
CanBeVerified = 1
RunHidden has also been set to 0 so we can see additional output. We can clean this up after our plugin is complete. When we set the CanBeVerified switch, a new ProcDOT variable called PROCDOTPLUGIN_VerificationRun is created and its initial value is set to 1. If the criteria for the verification passes, (in our case, is it a server node), this value will be set to 0 indicating the verification passed. If not, the value will remain 1. This will be a little easier to explain if I give you the code for the plugin and go through each part. Create a file called verify.bat with the following content:
@setlocal enabledelayedexpansion && python -x "%~f0" %* & exit /b !ERRORLEVEL!
import os
import sys
verify = os.getenv('PROCDOTPLUGIN_VerificationRun')
if os.getenv('PROCDOTPLUGIN_VerificationRun') == '0':
pass
else:
if os.getenv('PROCDOTPLUGIN_CurrentNode_name')[:6] == 'SERVER':
print 'PROCDOTPLUGIN_VerificationRun = ' + verify
raw_input('Yes. This is a server node.')
sys.exit(1)
else:
print 'PROCDOTPLUGIN_VerificationRun = ' + verify
raw_input('No. This is not a server node')
sys.exit(0)
def main():
print 'PROCDOTPLUGIN_VerificationRun = ' + verify
raw_input('Verification complete.')
if __name__ == '__main__':
main()
Lets take a closer look at what is going on.
if os.getenv('PROCDOTPLUGIN_VerificationRun') == '0':
pass
This part of the code is telling the plugin, that if everything is verified, to skip or "pass" everything else and go to the main function. Remember, PROCDOTPLUGIN_VerificationRun is initially set to 1, so we are going to have to create a condition to set it to 0. this is were the next part o f the code comes into play.
else:
if os.getenv('PROCDOTPLUGIN_CurrentNode_name')[:6] == 'SERVER':
print 'PROCDOTPLUGIN_VerificationRun = ' + verify
raw_input('Yes. This is a server node.')
sys.exit(1)
else:
print 'PROCDOTPLUGIN_VerificationRun = ' + verify
raw_input('No. This is not a server node')
sys.exit(0)
This part of the code is responsible for verifying a condition for our plugin. In the if statement, we are using the PROCDOTPLUGIN_CurrentNode_name variable to check if we are right clicking on a server node. If this is true, the plugin sets the exit code to 1. This will tell ProcDOT to change PROCDOTPLUGIN_VerificationRun to 0. If it is not a server node, the plugin will run the else statement and set the exit code to 0, leaving PROCDOTPLUGIN_VerificationRun set to 1. The print and raw_input statements are there for our debugging purposes so we can see what the plugin is doing.
After doing this check, if it is a server node, ProcDOT will set PROCDOTPLUGIN_VerificationRun to 0 and initialize our plugin. Our plugin can now run the rest of its code under main. Lets continue and see it in action. Start ProcDOT and refresh your graph.
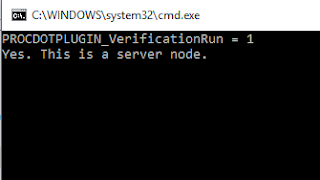
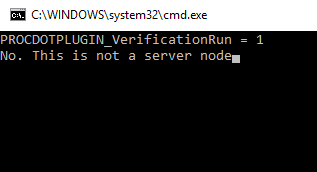
The first thing we are going to do is right click on a server node. When we do this, you should see the following command prompt come up:
This is the place in the code we are at now:
if os.getenv('PROCDOTPLUGIN_CurrentNode_name')[:6] == 'SERVER':
print 'PROCDOTPLUGIN_VerificationRun = ' + verify
raw_input('Yes. This is a server node.')
sys.exit(1)
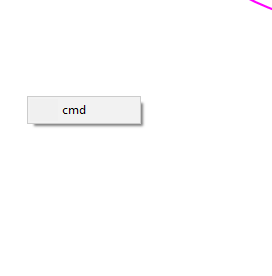
From here, hit enter. You will see the same command prompt come up again (ProcDOT does a double check for some reason). Hit enter one more time and then you should see the verify entry in the context menu.
This is the place in the code we are at now:
raw_input('Verification complete.')
if __name__ == '__main__':
main()
raw_input('No. This is not a server node')
sys.exit(0)
Context Menu plugins allow us to get more granular with the data we are after. Let's say we want a context menu item that is only available when we right click on a server node. The plugin engine offers this feature though the CanBeVerified switch.
Before we continue, lets alter our cmd_line plugin so it becomes a Context Menu Item instead of being in the Main Menu. Open the cmd_line.pdp file in an editor and change the type from MainMenuItem to ContextMenuItemForGraph. Your pdp file should now look like this:
Name = cmd
Author = <your name>
Description = Open cmd prompt from ProcDOT's Main Menu
Version = 1
Type = ContextMenuItemForGraph
Architecture = WindowsBatchScript
File = cmd_line.bat
Priority = 9
RunHidden = 1
RunExclusively = 1
CanOverrideOtherPlugins = 0
CanOverrideProcdot = 0
Restart ProcDOT and load your graph again. If we right click anywhere on the graph, we should see cmd in the context menu. What we are trying to accomplish though is having a plugin show up if we right click on a server node. Lets right click on a server node an see what we need to do to have this happen.
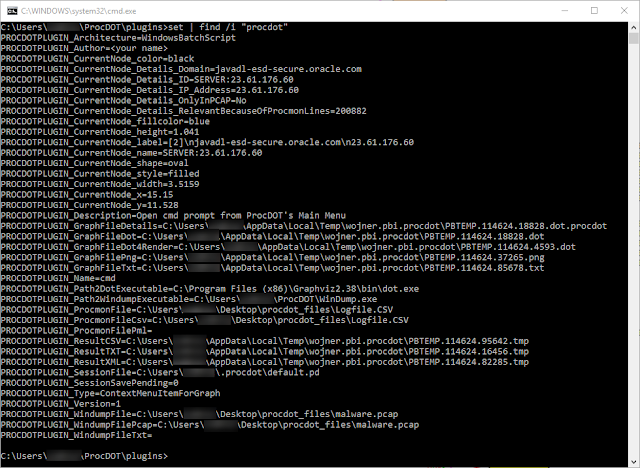
In the command prompt enter the following:
set | find /i "procdot"
You will notice that there are a lot more variables to choose from. Remember, this type of plugin allows us to get granular with what we are doing.
To do this, we first have to set the CanBeVerified switch to 1 in our pdp file (add CanBeVerified = 1 to the end of the file). Lets stop ProcDOT and create our verify plugin. We'll start by creating a new pdp file called verify.pdp with the following content (Notice it has the CanBeVerified switch).
Name = Verify
Author = <your name>
Description = verify test
Version = 1
Type = ContextMenuItemForGraph
Architecture = WindowsBatchScript
File = verify.bat
Priority = 9
RunHidden = 0
RunExclusively = 1
CanOverrideOtherPlugins = 0
CanOverrideProcdot = 0
CanBeVerified = 1
RunHidden has also been set to 0 so we can see additional output. We can clean this up after our plugin is complete. When we set the CanBeVerified switch, a new ProcDOT variable called PROCDOTPLUGIN_VerificationRun is created and its initial value is set to 1. If the criteria for the verification passes, (in our case, is it a server node), this value will be set to 0 indicating the verification passed. If not, the value will remain 1. This will be a little easier to explain if I give you the code for the plugin and go through each part. Create a file called verify.bat with the following content:
@setlocal enabledelayedexpansion && python -x "%~f0" %* & exit /b !ERRORLEVEL!
import os
import sys
verify = os.getenv('PROCDOTPLUGIN_VerificationRun')
if os.getenv('PROCDOTPLUGIN_VerificationRun') == '0':
pass
else:
if os.getenv('PROCDOTPLUGIN_CurrentNode_name')[:6] == 'SERVER':
print 'PROCDOTPLUGIN_VerificationRun = ' + verify
raw_input('Yes. This is a server node.')
sys.exit(1)
else:
print 'PROCDOTPLUGIN_VerificationRun = ' + verify
raw_input('No. This is not a server node')
sys.exit(0)
def main():
print 'PROCDOTPLUGIN_VerificationRun = ' + verify
raw_input('Verification complete.')
if __name__ == '__main__':
main()
Lets take a closer look at what is going on.
if os.getenv('PROCDOTPLUGIN_VerificationRun') == '0':
pass
This part of the code is telling the plugin, that if everything is verified, to skip or "pass" everything else and go to the main function. Remember, PROCDOTPLUGIN_VerificationRun is initially set to 1, so we are going to have to create a condition to set it to 0. this is were the next part o f the code comes into play.
else:
if os.getenv('PROCDOTPLUGIN_CurrentNode_name')[:6] == 'SERVER':
print 'PROCDOTPLUGIN_VerificationRun = ' + verify
raw_input('Yes. This is a server node.')
sys.exit(1)
else:
print 'PROCDOTPLUGIN_VerificationRun = ' + verify
raw_input('No. This is not a server node')
sys.exit(0)
This part of the code is responsible for verifying a condition for our plugin. In the if statement, we are using the PROCDOTPLUGIN_CurrentNode_name variable to check if we are right clicking on a server node. If this is true, the plugin sets the exit code to 1. This will tell ProcDOT to change PROCDOTPLUGIN_VerificationRun to 0. If it is not a server node, the plugin will run the else statement and set the exit code to 0, leaving PROCDOTPLUGIN_VerificationRun set to 1. The print and raw_input statements are there for our debugging purposes so we can see what the plugin is doing.
After doing this check, if it is a server node, ProcDOT will set PROCDOTPLUGIN_VerificationRun to 0 and initialize our plugin. Our plugin can now run the rest of its code under main. Lets continue and see it in action. Start ProcDOT and refresh your graph.
The first thing we are going to do is right click on a server node. When we do this, you should see the following command prompt come up:
This is the place in the code we are at now:
if os.getenv('PROCDOTPLUGIN_CurrentNode_name')[:6] == 'SERVER':
print 'PROCDOTPLUGIN_VerificationRun = ' + verify
raw_input('Yes. This is a server node.')
sys.exit(1)
From here, hit enter. You will see the same command prompt come up again (ProcDOT does a double check for some reason). Hit enter one more time and then you should see the verify entry in the context menu.
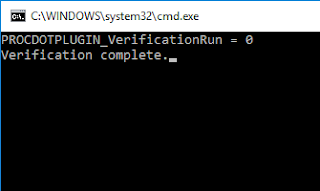
If we left click on Verify, we should be presented with the following command prompt:
This is the place in the code we are at now:
def main():
print 'PROCDOTPLUGIN_VerificationRun = ' + verifyraw_input('Verification complete.')
if __name__ == '__main__':
main()
Hit enter to clear the command prompt. So far it seems to be working. Lets do one more test to make sure it only shows up when we click on a server node. Now, right click anywhere except for on a server node. You should see the following command prompt:
This is the place in the code we are now:
else:
print 'PROCDOTPLUGIN_VerificationRun = ' + verifyraw_input('No. This is not a server node')
sys.exit(0)
Hit enter, and then hit enter again. If everything worked, Verify should not show up in the context menu:
As you can see, you can set conditions for when your plugin will show up in the context menu. This is not just for a server node, this can be applied to any conditions you want met. All that you need to do to give it some function is to add your code to the main function. I hope I did a good job of explaining how this works. It can seem a little confusing at first.
Tuesday, June 6, 2017
ProcDOT plugin writing. Part 3 - Creating a Main Menu plugin
In the last two posts (Part 1, Part 2), we created a simple plugin and explored some of the files that ProcDOT stores data in. We will now leverage both of these to create a plugin that lists the servers in the graph. This is not a tutorial on python but, I will try to explain some of the plugin to show where the information is coming from. Yes, I know, Christian has already made this plugin. But, by looking at this plugin, it helped me to figure some of this stuff out when I first started out writing plugins. If you remember from part 1, there was a reason I liked to use python. By rewriting this plugin in python, I only have to maintain one plugin (the serverslist plugin has a batch script for Windows and a bash script for Linux).
We'll start out by firing up ProcDOT and generate our graph.Looking at the graph, I have eight different server nodes (yours might be different). Make note of the servers listed.
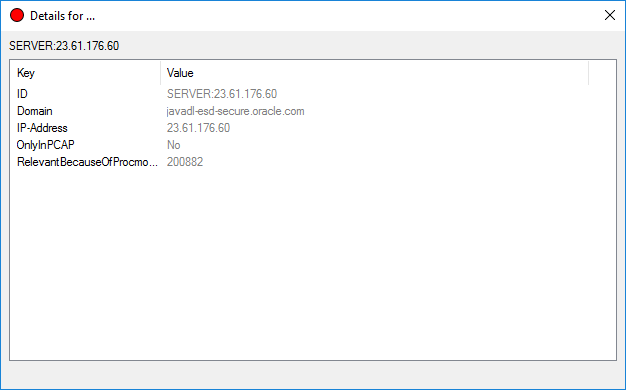
Looking at the details for a server node, we can see there are five different keys and values. With this information, we can start to build our plugin.Go to the Plugin menu and launch the cmd plugin. So, we now know the information we are after is in the details file. If we type set | find /i "procdot" in the cmd prompt, we can see the variable that we will have to call is PROCDOTPLUGIN_GraphFileDetails. If we want to display output, we will also have to call PROCDOTPLUGIN_ResultCSV or PROCDOTPLUGIN_ResultXML because we are going to create a table. We will create our plugin output with PROCDOTPLUGIN_ResultCSV for this example.
From here, drop into a python shell by typing python and hit enter.
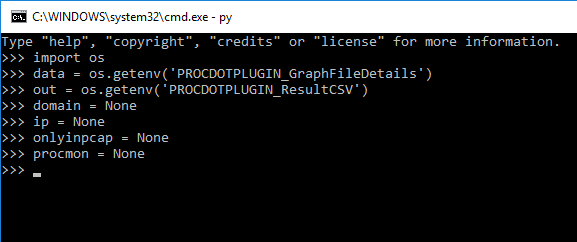
We will need to import os into the python shell so we can get our ProcDOT variables and assign them in our plugin.After that, we will create some variables for our key data we are after.
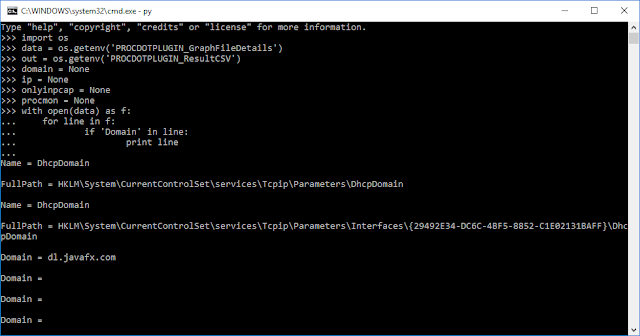
Next we will open the details file in python and search it, line by line, for the Domain keys. For every hit we get on Domain, we'll have python print it out.
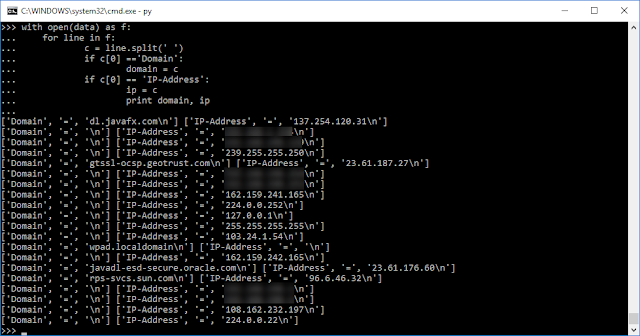
Hmmm. Looks like we are getting back the Domain key and then some. Looking at the format of the file, we can split the lines apart with a space. This will split the line into three parts. We can go back and search the first part for Domain and try it again.
Now we are getting somewhere! But there is another problem. Not every server node has a Domain tied to it. If we look back, we can see that we can also search for the IP-Address. I we assign these to our variables, we can print these together.
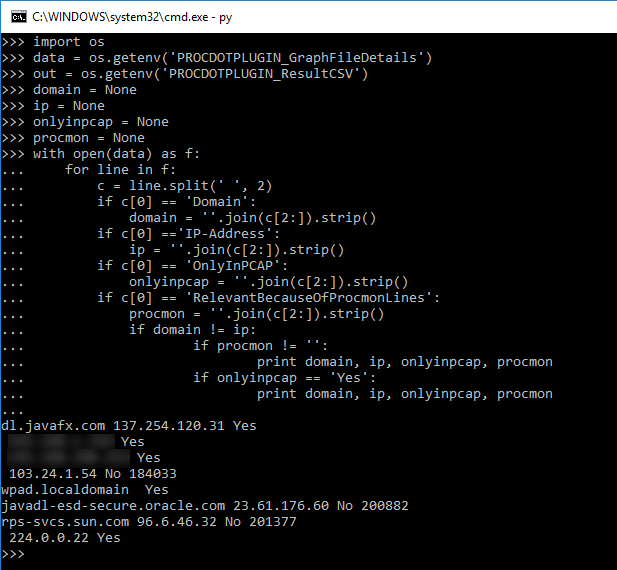
Looks good. We can now identify a server node by either its Domain or IP-Address. Wait a minute though. My graph had only eight server nodes in it. Lets list out the rest of our keys and see if we can narrow this list down.
So, looking at the output, we can see that the server nodes that are in the graph also contain an entry in the RelevantBecauseOfProcmonLines key. And the server nodes that are marked yes in the OnlyInPCAP key are also in the graph. Lets parse this out a little more and strip out what we don't before we write our actual plugin. We'll reset some of our variables and finish this up.
Nice! We can now write our plugin. In order for our output to come out right, we will have to refer to the ProcDOT documentation to make sure the result csv is properly formatted.
So looking at this, the first line of the file contains the headers surrounded in quotation marks and separated by commas. The next line is the column widths, then finally our data. We are only going to have headers for the Domain and the IP-Address. We'll add some style by marking the server nodes that are only in the pcap with blue lettering. With our plan in place, we can create the plugin and the pdp file.
server.pdp
Name = server
Author = <your name>
Description = Open cmd prompt from ProcDOT's Main Menu
Version = 1
Type = MainMenuItem
Architecture = WindowsBatchScript
File = server.bat
Priority = 9
RunHidden = 1
RunExclusively = 1
CanOverrideOtherPlugins = 0
CanOverrideProcdot = 0
server.bat
@setlocal enabledelayedexpansion && python -x "%~f0" %* & exit /b !ERRORLEVEL!
import os
def main():
data = os.getenv('PROCDOTPLUGIN_GraphFileDetails')
out = os.getenv('PROCDOTPLUGIN_ResultCSV')
outfile =open(out, 'w')
domain = None
ip = None
onlyinpcap = None
procmon = None
outfile.write('"Domain","IP-Address"\n')
outfile.write('"*","*"\n')
with open(data) as f:
for line in f:
c = line.split(' ', 2)
if c[0] == 'Domain':
domain = ''.join(c[2:]).strip()
if c[0] =='IP-Address':
ip = ''.join(c[2:]).strip()
if c[0] == 'OnlyInPCAP':
onlyinpcap = ''.join(c[2:]).strip()
if c[0] == 'RelevantBecauseOfProcmonLines':
procmon = ''.join(c[2:]).strip()
if domain != ip:
if procmon != '':
outfile.write('"' +domain + '","' + ip + '"\n')
if onlyinpcap == 'Yes':
outfile.write('{{color:blue}}' + '"' + domain + '","' + ip + '"\n')
if __name__ == '__main__':
main()
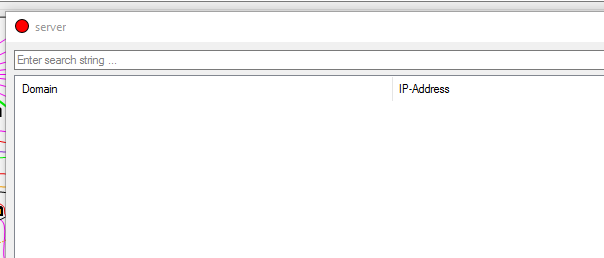
Save these to your plugin folder restart ProcDOT and generate a graph. From the Plugin menu, select server and you should see the results.
Success! We made a plugin to display all the servers in the graph. Before we conclude, the cmd plugin can be used to troubleshoot our plugin. Lets say we made a typo in our plugin and no results were returned. We can't see any of the error messages to see what happened. To test this out, open the server.bat file and change domain = None to dmain = None and save the file. If we run the server plugin again our results come back empty.
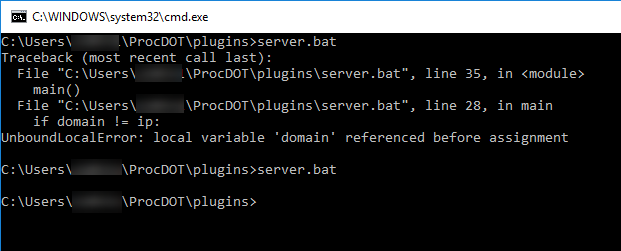
We don't know why because we cannot see the errors. Close out the results and launch the cmd plugin from the Plugin menu. From this command prompt, we can run the server plugin manually. Type server.bat in the command prompt and hit enter.
From the output, we can see the error UnboundLocalError: local variable 'domain' referenced before assignment. If we edit server.bat back to domain = None and save again, we can run the plugin manually and see that there are no more errors. Pretty neat!
Our simple cmd plugin turns out to be rather useful for writing and troubleshooting plugins. Now that we have a way to better develop our plugins, we will create a plugin for the context menu in the next tutorial.
We'll start out by firing up ProcDOT and generate our graph.Looking at the graph, I have eight different server nodes (yours might be different). Make note of the servers listed.
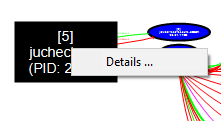
Right click on one of the server nodes and select details.
From here, drop into a python shell by typing python and hit enter.
We will need to import os into the python shell so we can get our ProcDOT variables and assign them in our plugin.After that, we will create some variables for our key data we are after.
Next we will open the details file in python and search it, line by line, for the Domain keys. For every hit we get on Domain, we'll have python print it out.
Hmmm. Looks like we are getting back the Domain key and then some. Looking at the format of the file, we can split the lines apart with a space. This will split the line into three parts. We can go back and search the first part for Domain and try it again.
Now we are getting somewhere! But there is another problem. Not every server node has a Domain tied to it. If we look back, we can see that we can also search for the IP-Address. I we assign these to our variables, we can print these together.
So, looking at the output, we can see that the server nodes that are in the graph also contain an entry in the RelevantBecauseOfProcmonLines key. And the server nodes that are marked yes in the OnlyInPCAP key are also in the graph. Lets parse this out a little more and strip out what we don't before we write our actual plugin. We'll reset some of our variables and finish this up.
Nice! We can now write our plugin. In order for our output to come out right, we will have to refer to the ProcDOT documentation to make sure the result csv is properly formatted.
So looking at this, the first line of the file contains the headers surrounded in quotation marks and separated by commas. The next line is the column widths, then finally our data. We are only going to have headers for the Domain and the IP-Address. We'll add some style by marking the server nodes that are only in the pcap with blue lettering. With our plan in place, we can create the plugin and the pdp file.
server.pdp
Name = server
Author = <your name>
Description = Open cmd prompt from ProcDOT's Main Menu
Version = 1
Type = MainMenuItem
Architecture = WindowsBatchScript
File = server.bat
Priority = 9
RunHidden = 1
RunExclusively = 1
CanOverrideOtherPlugins = 0
CanOverrideProcdot = 0
server.bat
@setlocal enabledelayedexpansion && python -x "%~f0" %* & exit /b !ERRORLEVEL!
import os
def main():
data = os.getenv('PROCDOTPLUGIN_GraphFileDetails')
out = os.getenv('PROCDOTPLUGIN_ResultCSV')
outfile =open(out, 'w')
domain = None
ip = None
onlyinpcap = None
procmon = None
outfile.write('"Domain","IP-Address"\n')
outfile.write('"*","*"\n')
with open(data) as f:
for line in f:
c = line.split(' ', 2)
if c[0] == 'Domain':
domain = ''.join(c[2:]).strip()
if c[0] =='IP-Address':
ip = ''.join(c[2:]).strip()
if c[0] == 'OnlyInPCAP':
onlyinpcap = ''.join(c[2:]).strip()
if c[0] == 'RelevantBecauseOfProcmonLines':
procmon = ''.join(c[2:]).strip()
if domain != ip:
if procmon != '':
outfile.write('"' +domain + '","' + ip + '"\n')
if onlyinpcap == 'Yes':
outfile.write('{{color:blue}}' + '"' + domain + '","' + ip + '"\n')
if __name__ == '__main__':
main()
Save these to your plugin folder restart ProcDOT and generate a graph. From the Plugin menu, select server and you should see the results.
Success! We made a plugin to display all the servers in the graph. Before we conclude, the cmd plugin can be used to troubleshoot our plugin. Lets say we made a typo in our plugin and no results were returned. We can't see any of the error messages to see what happened. To test this out, open the server.bat file and change domain = None to dmain = None and save the file. If we run the server plugin again our results come back empty.
We don't know why because we cannot see the errors. Close out the results and launch the cmd plugin from the Plugin menu. From this command prompt, we can run the server plugin manually. Type server.bat in the command prompt and hit enter.
From the output, we can see the error UnboundLocalError: local variable 'domain' referenced before assignment. If we edit server.bat back to domain = None and save again, we can run the plugin manually and see that there are no more errors. Pretty neat!
Our simple cmd plugin turns out to be rather useful for writing and troubleshooting plugins. Now that we have a way to better develop our plugins, we will create a plugin for the context menu in the next tutorial.
Friday, June 2, 2017
ProcDOT plugin writing. Part 2 - ProcDOT data and results files
In the last post, we created a plugin that calls the command prompt. We can now use this to start writing a plugin that will be a little more useful. But, before we go further, lets look at the three different plugins and what they are used for.
The first type of plugin is a MainMenuItem (like the plugin we created earlier). When creating these types of plugins, think big picture. Main Menu plugins have access to things like the pcap file, procmon file, ProcDOTs graph and detail files, and result files. We can pull a lot of data but we wouldn't want to use these if we are trying to do something more granular.
The next type of plugin is a ContextMenuItemForGraph. This is where we would want to run a plugin on a smaller data set. These plugins have access to everything listed above and more. These plugins focus heavily on node details in the graph.
Lastly, we have EventHandler plugins. To be honest, I have not used these plugins yet. From what I can tell, they appear to wait for an event, like a button push or a click, and act upon that function. When I get time, I'll explore these more and add them to the tutorials.
Lets get back to our plugin. Before we go further, you may have noticed that two command windows are spawned when the plugin starts. We can go back to our descriptor file and fix this. If we open our cmd_line.pdp file, there is a keyname called RunHidden. If we change the value to 1, this should fix our problem. With that out of the way, lets move on to bigger and better things.
Start up ProcDOT and generate a graph. After the graph is loaded, launch the cmd plugin from the plugin menu. From here, run the command, set | find /i "procdot". We can see in this list all the variables that ProcDOT creates to give us access to the data it sees. We are now going to look at some of these variables and start laying the foundation to write some more useful plugins.
So, where do we get the data from to start writing a plugin? We'll now go through these to figure out what everything is.
ProcDOT data files
The PROCDOTPLUGIN_WindumpFile, PROCDOTPLUGIN_WindumpFilePcap, and PROCDOTPLUGIN_WindumpFileTxt variables will give us access to the pcap file.
The PROCDOTPLUGIN_ProcmonFile, PROCDOTPLUGIN_ProcmonFileCsv, and PROCDOTPLUGIN_ProcmonFilePml will allow us to work with the Procmon file.
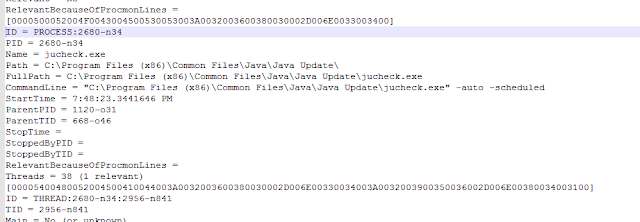
This is where things start to get interesting. The PROCDOTPLUGIN_GraphFileDetails variable contains the details information. This is the same information in ProcDOT if we were to right click a node and click on details.
If we navigate to the file location and open it in a text editor, we will find the same information.
The next ones we will look at are PROCDOTPLUGIN_GraphFileDot and PROCDOTPLUGIN_GraphFileDot4Render. These are the dot files that graphviz uses to render the graphs. From what I can tell, both of these files are the same. The plugin engine is under development so they may be used for different things later on or one of them might get dropped completely. These files contain the information on how everything is related.
The PROCDOTPLUGIN_GraphFileTxt variable contains the graph layout generated by graphviz's dot binary. It contains similar information to PROCDOTPLUGIN_GraphFileDot and PROCDOTPLUGIN_GraphFileDot4Render.
The last variable for information we are going to look at is PROCDOTPLUGIN_GraphFilePng. This is the graph image in PNG format. According to ProcDOT's documentation, it looks like this variable is going to be depreciated.
ProcDOT Results
All this is great but how do we get information out of ProcDOT? ProcDot offers this through its result variable. There are three different types in the current version (looks like a fourth option for image files in the future from the documentation). These variable are PROCDOTPLUGIN_ResultCSV, PROCDOTPLUGIN_ResultTXT, and PROCDOTPLUGIN_ResultXML. You may have guess it by the names, we can get results in xml, csv, and txt. PROCDOTPLUGIN_ResultCSV and PROCDOTPLUGIN_ResultXML are used to make table output complete with styling. PROCDOTPLUGIN_ResultTXT is used for creating plain text results (styling is comming to this in a future release also).
I think I will end this post here. There is a lot of information to go over so start digging into some of the files to see what information they contain. In the next post, we will create a plugin that uses some of this information.
Tuesday, May 30, 2017
ProcDOT plugin writing. Part 1 - Creating your first plugin.
ProcDOT is a malware analysis tool created by Christian Wojner (CERT.at -
CERT Austria). The tool is designed to correlate Procmon logs and PCAP
data. ProcDOT takes this data and lets you visualize the information in a
graph loaded with useful information. It also contains a simple, yet
powerful plugin engine designed to help analysts extend the capabilities
of ProcDOT. More information can be found at the ProcDOT website.
I decided to write these tutorials to help others with the creation of plugins for ProcDOT. My hope is that these tutorials will help with some of the frustration and issues I have had when creating plugins. For these tutorials, we need to have our system setup properly.
Most, if not all, of my plugins are written in python. Why python? I wanted to have a language that could be used on both Windows and Linux so I did not have to write separate plugins for each. This also helps with maintaining plugins because if you can get it to work on one system, it should work on the other, for the most part.
Another thing to note. I also try to stick with LinuxShellScript and WindowsBatchScript for the architecture. This is so I don't need to create different pdp files for 32 and 64 bit systems.
I'm not going to go into how to setup ProcDOT. If I have to explain that then you probably shouldn't be reading this yet.
For these tutorials, I will be using Windows, ProcDOT 1.2 [Build 55u], and python2.7. You can download python2.7 here. When installing python, make sure the executable is in the system path. You need to be able to call python from the command line for these tutorials to work.
In this post, we will create our first plugin. As we go through other tutorials, this plugin will come in handy for troubleshooting and plugin development.
ProcDOT's plugins consist of two parts:
The following table lists the keynames and their uses for the descriptor file:
Let's begin by making a plugin for the Main Menu that opens the Windows command prompt. Although this plugin will not be very useful right now, it will be in later posts to help write other plugins. Back to the descriptor file.
Create a file named cmd_line.pdp in the ProcDOT plugin folder. If you do not have this folder, it can be created in the same folder the ProcDOT executable is located in. Inside this file we will place the following:
Name = cmd
Author = <your name>
Description = Open cmd prompt from ProcDOT's Main Menu
Version = 1
Type = MainMenuItem
Architecture = WindowsBatchScript
File = cmd_line.bat
Priority = 9
RunHidden = 0
RunExclusively = 1
CanOverrideOtherPlugins = 0
CanOverrideProcdot = 0
Now that we have our descriptor file, we can start to create our plugin. Notice in the descriptor file, File = cmd_line.bat. This will be our plugin. In the plugin directory, create a file called cmd_line.bat and place the following inside:
@setlocal enabledelayedexpansion && python -x "%~f0" %* & exit /b !ERRORLEVEL!
#!/usr/bin/env python
import os
os.system("start /wait cmd /K")
Lets break down what what this plugin will do:
Because we are calling our plugin in a batch file, the first line, @setlocal enabledelayedexpansion && python -x "%~f0" %* & exit /b !ERRORLEVEL!, calls python and executes the rest of the script through the python interpreter. This is so we do not have to associate .py files with python itself.
The rest of the lines are our python code to open the command prompt.
Lets fire up ProcDOT and see if our new plugin works.
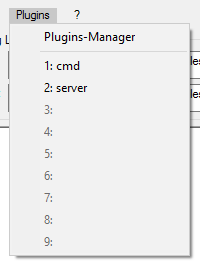
When we click on the Plugins menu, there should be an entry called cmd.

Lets double check to make sure there are no errors in out plugin. We can do this by clicking on the Plugins-Manager. If there are not any errors, your screen should look like the one below.

We can also view the details of the plugin by clicking on the plugin from the Plugins-Manager menu.

Time to load up a pcap and a procmon trace to see if everything is working with the plugin Once the graph is generated, open the Plugins menu and select cmd. If everything worked you should have a command prompt open on your screen. If we type set | find /i "procdot" into this cmd prompt, we should see a list of ProcDOT variables to work with.

Success! We have created our first plugin.
In the upcoming post, we will use this plugin to create and troubleshoot other plugins.
I decided to write these tutorials to help others with the creation of plugins for ProcDOT. My hope is that these tutorials will help with some of the frustration and issues I have had when creating plugins. For these tutorials, we need to have our system setup properly.
Most, if not all, of my plugins are written in python. Why python? I wanted to have a language that could be used on both Windows and Linux so I did not have to write separate plugins for each. This also helps with maintaining plugins because if you can get it to work on one system, it should work on the other, for the most part.
Another thing to note. I also try to stick with LinuxShellScript and WindowsBatchScript for the architecture. This is so I don't need to create different pdp files for 32 and 64 bit systems.
I'm not going to go into how to setup ProcDOT. If I have to explain that then you probably shouldn't be reading this yet.
For these tutorials, I will be using Windows, ProcDOT 1.2 [Build 55u], and python2.7. You can download python2.7 here. When installing python, make sure the executable is in the system path. You need to be able to call python from the command line for these tutorials to work.
In this post, we will create our first plugin. As we go through other tutorials, this plugin will come in handy for troubleshooting and plugin development.
ProcDOT's plugins consist of two parts:
- The plugin descriptor file
- The plugin itself
The following table lists the keynames and their uses for the descriptor file:
| Keyname | Description | Possible values | Supported plugin types |
| Name | Specifies the name of the plugin. | [Ascii] | all |
| Author | Specifies the name of the author. | [Ascii] | all |
| Description | Specifies a description for the plugin. | [Ascii] | all |
| Version | Specifies the version of the plugin. | [Ascii] | all |
| Type | Specifies the type of the plugin. Currently 3 types are supported: - ContextMenuItemForGraph ... The plugin is available through the context menu that popps up when the right mouse button is pressed while hovering the canvas area of the graph. - EventHandler ... The plugin is automatically registered (and therefore called) as an eventhandler for the given event constant(s) via "Event = " or "Events = ". - MainMenuItem ... The plugin is available through the main menu item "Plugins". Currently there can exist 9 main menu item plugins in maximum. |
ContextMenuItemForGraph EventHandler MainMenuItem |
all |
| Architecture | Specifies the architecture the plugin was developed for. | Linux32BitExe Linux32BitSo Linux64BitExe Linux64BitSo LinuxShellScript Windows32BitDll Windows32BitExe Windows64BitDll Windows64BitExe WindowsBatchScript |
all |
| File | Specifies the file to be used as the actual plugin. | [Filename] | all |
| Priority | Specifies the position of the actual plugin in case of multiple matching plugins from 1 to 9 with 1 being the highest priority and 9 being the lowest. | 1 - 9 | all |
| RunHidden | Tells ProcDOT to run the actual plugin hidden hennce preventing any windows from popping up. (1 = True, 0 = False) | 1 / 0 | all |
| RunExclusively | Tells ProcDOT to not run any other non-exclusive plugin in parallel to this one. (1 = True, 0 = False) | 1 / 0 | all |
| CanOverrideOtherPlugins | Specifies that if the actual plugin exits with a return code of 1 any other plugin being in the queue waiting to run will be skipped. (1 = True, 0 = False) | 1 / 0 | all |
| CanOverrideProcDot | Specifies that if the actual plugin exits with a return code of 1 any following builtin functionality of ProcDOT will be skipped. (1 = True, 0 = False) | 1 / 0 | all |
| CanBeVerified | Specifies that this plugin can also be called in verification mode
(Environmentvariable PROCDOTPLUGIN_VerificationRun) to decide if it's
able to handle the hovered node or situation. (1 = True, 0 = False) The actual plugin needs to exit with a return code of 1 to signal that it's able to properly handle an according "real" call. |
1 / 0 | all |
| Event or Events |
Specifies the event (or events seperated with colons) for which the actual plugin shall be registered for as an event handler. | BeforeLeftClickOnGraph BeforeLeftDblClickOnGraph BeforeMiddleClickOnGraph BeforeMiddleDblClickOnGraph BeforeRightClickOnGraph BeforeRightDblClickOnGraph AfterLeftClickOnGraph AfterLeftDblClickOnGraph AfterMiddleClickOnGraph AfterMiddleDblClickOnGraph AfterRightClickOnGraph AfterRightDblClickOnGraph BeforeRefresh AfterRefresh BeforeProcmonButtonClick AfterProcmonButtonClick BeforeWindumpButtonClick AfterWindumpButtonClick BeforeLauncherButtonClick AfterLauncherButtonClick BeforeSwitchToFrameMode AfterSwitchToFrameMode BeforeSwitchToNormalMode AfterSwitchToNormalMode BeforeTimelineFirstFrame AfterTimelineFirstFrame BeforeTimelinePreviousFrame AfterTimelinePreviousFrame BeforeTimelineNextFrame AfterTimelineNextFrame BeforeTimelineLastFrame AfterTimelineLastFrame BeforeTimelinePlayAnimation AfterTimelinePlayAnimation BeforeTimelineStopAnimation AfterTimelineStopAnimation |
EventHandler |
Figure 1. From ProcDOT's documentation.
Let's begin by making a plugin for the Main Menu that opens the Windows command prompt. Although this plugin will not be very useful right now, it will be in later posts to help write other plugins. Back to the descriptor file.
Create a file named cmd_line.pdp in the ProcDOT plugin folder. If you do not have this folder, it can be created in the same folder the ProcDOT executable is located in. Inside this file we will place the following:
Name = cmd
Author = <your name>
Description = Open cmd prompt from ProcDOT's Main Menu
Version = 1
Type = MainMenuItem
Architecture = WindowsBatchScript
File = cmd_line.bat
Priority = 9
RunHidden = 0
RunExclusively = 1
CanOverrideOtherPlugins = 0
CanOverrideProcdot = 0
Now that we have our descriptor file, we can start to create our plugin. Notice in the descriptor file, File = cmd_line.bat. This will be our plugin. In the plugin directory, create a file called cmd_line.bat and place the following inside:
@setlocal enabledelayedexpansion && python -x "%~f0" %* & exit /b !ERRORLEVEL!
#!/usr/bin/env python
import os
os.system("start /wait cmd /K")
Lets break down what what this plugin will do:
Because we are calling our plugin in a batch file, the first line, @setlocal enabledelayedexpansion && python -x "%~f0" %* & exit /b !ERRORLEVEL!, calls python and executes the rest of the script through the python interpreter. This is so we do not have to associate .py files with python itself.
The rest of the lines are our python code to open the command prompt.
Lets fire up ProcDOT and see if our new plugin works.
When we click on the Plugins menu, there should be an entry called cmd.
Lets double check to make sure there are no errors in out plugin. We can do this by clicking on the Plugins-Manager. If there are not any errors, your screen should look like the one below.
We can also view the details of the plugin by clicking on the plugin from the Plugins-Manager menu.
Time to load up a pcap and a procmon trace to see if everything is working with the plugin Once the graph is generated, open the Plugins menu and select cmd. If everything worked you should have a command prompt open on your screen. If we type set | find /i "procdot" into this cmd prompt, we should see a list of ProcDOT variables to work with.
Success! We have created our first plugin.
In the upcoming post, we will use this plugin to create and troubleshoot other plugins.
Subscribe to:
Posts (Atom)


